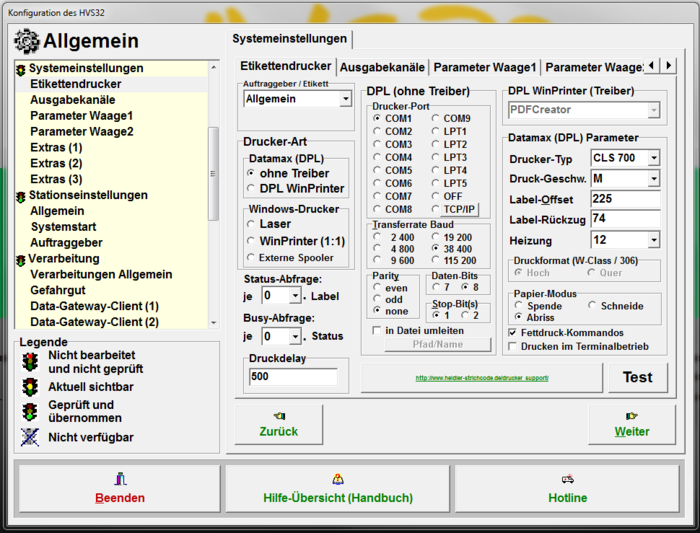
Configurator: label printer
Setup -> Configurator -> General -> Label printer
All settings for the use of a label printer must be made under system settings -> Label Printer
Fundamentally there are two types of printing for which different label templates are used. This has an effect on any existing customized label templates.
Label printing via the Windows driver uses List&Label(L&L) templates and direct printing via DPL (Datamax Printer Language) uses the DPL templates.
Client / Label
In order to be able to use this function, settings from Heidler Support must be made.
Special settings for individual clients or specific labels can be used.
Printer-type
Datamax (DPL)
- You do not need any drivers for this printer-type because the labels are sent directly to the printer in DPL printer language. The printer must support DPL language accordingly which is the case with most Datamax and Citizen devices.
(Notice: Zebra Printers do not support DPL and must be then controlled via Windows-Drivers !)
- The necessary settings for communication between HVS32 and the printer is made on this mask.
Without Drivers
- Printing is done via DPL and all settings are made on this mask.
DPL WinPrinter
- The data is also sent to the printer as a DPL, but the driver handles the communitcation. This has the advantage of printers being able to be controlled via USB for example but prints DPL.
Windows-Drivers
- For this type of printer you will need drivers. Communication is largely controlled via the drivers. The List & Label Templates are used for this type of printer.
Laser
- Select this option if your printer is an A4 laser printer and you are using label sheets with 4 labens on one page.
WinPrinter (1:1)
- The printer is controlled completely by the driver. You can choose the label output between as a PDF or as an image.
External Spoolers
Def.
Status-Query
Def.
Busy-Query
Def.
Printer delay
Def.
Printer DPI
Here you can set the DPI of the labels for the driver printers.
DPL (without drivers)
Printer-Port
- Select which port the printer is connected to. Various COM ports (RS232 interface), LPT ports and TCP/IP are available for selection.
COM and LPT
- These are serial interfaces that must be present directly on your PC.
TCP/IP
- If the printer is controlled via TCP/IP, select this and open the configuration for this by pressing TCP/IP.
- IP
- Enter the IP address of the printer.
- Port
- Enter the port of the printer.
- Timeout
- Under Timeout you can specify the maximum waiting time until the HVS32 u´issues ab error if the printer cannot be reached.
- Validate
- Validate is a DPL feature that checks and makes HVS32 wait until the label has been printed out by the printer.
- Ready Check
- Before printing, it is checked whether the printer is ready to print the label immediately (so there is no queue in the printer itself). By default, the HVS32 waits up to 5 seconds before reporting an error.
ATTENTION: Both Validate and Ready Check are advanced DPL functions which are not necessarily supported by every DPL printer. In addition, an error message is output, which is treated as a DPL printer error (before e.g. if COM1 was not ready), this can stop the Automatic-polling stoppen. Therefore use of this function is only for testing the printer.
Transfer rate Baud
- The baud rate must be the same as the one set on the printer.
Parity
- Set whether there should be the parity bit. If so, set whether it should be even or odd. This setting must be identical to the printer's internal configuration.
Data-Bits
- Specify the length of the data bits. This setting must be identical to the printer's internal configuration.
Stop-Bit(s)
- Specify here how many stop bits the transmission should have.
in Datei umleiten
- The data for printing is written to a file which you have defined under path/name (Example: "C:\\HVS32\\PrinterOutput\\DPL\\druck.txt").
This function is only available in combination with DruckerArtt "without Drivers" usable. In this case, no data is transferred to the printer.
DPL WinPrinter (Driver)
Select the printer driver that you want to use so that a DPL label can be controlled via the driver.
Datamax (DPL) Parameter
These settings can only be made if the so-called "Settings Lock" is not activated in the internal printer configuration.
The quality of the label can be improved, by decreasing the Druck-Geschwindigkeitand increasing the Heizung . This has a corresponding effect on the duration of the printout.
Printer-Type
- Each printer type has preset parameters. If available, select the printer that you own. If the parameters are not correct, you can change them with the following options.
Printing-Speed
- The higher the alphabet, the faster the label will be printed. (A= Slow / Z = Fast)
Label-Offset
- This value determines from which position the printer starts to print on the label.
Label-Pull back
- How far the printer has to pull the label back after printing so that the label rests on the tear-off edge.
Heating
- The higher the number, the more heat the printer uses to transfer the ink to the label.
Druckformat
- This setting can only be used when using a Datamax W-Class printer as the printer type. Here you can choose whether to print in portrait or landscape format.
Paper mode
- Def.
- Gift
- Sheath
- Tear-Off
Bold Commands
- Special labels require commands to print bold text.
- However, since these commands cannot be implemented by every printer, the option should only be used if it is ensured that the printer used supports these commands.
Printing in terminal mode
- The interface is controlled directly in a terminal session, which brings a performance advantage.
Test
Print a test label to check functionality. The settings of the HVS32 are printed on the label.
