General installation instructions: Unterschied zwischen den Versionen
| (6 dazwischenliegende Versionen desselben Benutzers werden nicht angezeigt) | |||
| Zeile 17: | Zeile 17: | ||
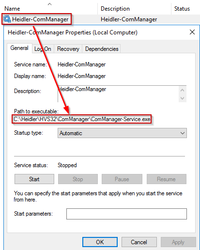
# Look for matching entries using the '''Service name''' column in the table under '''[[General installation instructions#Installation instructions|Installation instructions]]''', note that if there are multiple instances installed, only a part ot the name is included (e.g. instead of HVS32MonitoringService, HVS32MonitoringService_Auto01 or HVS32Monitoring_Auto01) | # Look for matching entries using the '''Service name''' column in the table under '''[[General installation instructions#Installation instructions|Installation instructions]]''', note that if there are multiple instances installed, only a part ot the name is included (e.g. instead of HVS32MonitoringService, HVS32MonitoringService_Auto01 or HVS32Monitoring_Auto01) | ||
# Make a note of the path(s) displayed under Properties for later update | # Make a note of the path(s) displayed under Properties for later update | ||
| − | |style="vertical-align:middle;"|[[Datei: | + | |style="vertical-align:middle;"|[[Datei:ComManager_Service_path.png|alternativtext=ComManager Dienst Pfad|frameless|center|200px|mini|ComManager Service path]] |
|- style="vertical-align:top;" | |- style="vertical-align:top;" | ||
| | | | ||
| Zeile 25: | Zeile 25: | ||
# Make sure the hits are not unused local copies | # Make sure the hits are not unused local copies | ||
# Make a note of the path(s) for later update | # Make a note of the path(s) for later update | ||
| − | |style="vertical-align:middle;"|[[Datei: | + | |style="vertical-align:middle;"|[[Datei:ComManager_EXE_path.png|alternativtext=ComManager EXE Pfad|frameless|center|300px|mini|ComManager EXE path]] |
|} | |} | ||
| Zeile 33: | Zeile 33: | ||
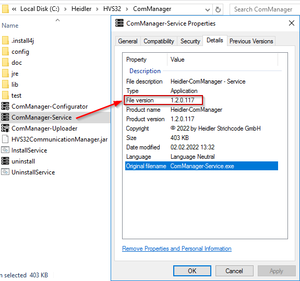
| To verify the version, open the file properties of the '''Main EXE''' of the application (see table under [[General installation instructions#Installation instructions|'''Installation instructions''']]) in Explorer. | | To verify the version, open the file properties of the '''Main EXE''' of the application (see table under [[General installation instructions#Installation instructions|'''Installation instructions''']]) in Explorer. | ||
[application].exe -> Right click -> Properties -> Details -> File version / Product version | [application].exe -> Right click -> Properties -> Details -> File version / Product version | ||
| − | |[[Datei: | + | |[[Datei:ComManager_details_file_version.png|frameless|mini|Show version]] |
|} | |} | ||
| Zeile 45: | Zeile 45: | ||
* Start setup with administrative privileges (right click -> Run as administrator) | * Start setup with administrative privileges (right click -> Run as administrator) | ||
* Selection of the installation path | * Selection of the installation path | ||
| − | ** No installation was detected [[Datei: | + | ** No installation was detected [[Datei:Setup_Installation_not_detected.png|200px|frameless|thumb|Setup Installation not detected]] |
| − | *** Enter the installation path [[Datei: | + | *** Enter the installation path [[Datei:Setup_enter_path.png|200px|frameless|thumb|Setup enter path]] and confirm with '''Next''' |
| − | ** At least one installation was detected [[Datei: | + | ** At least one installation was detected [[Datei:Setup_Installation_detected.png|200px|frameless|thumb|Setup Installation detected]] |
| − | *** Compare the installation path with the previously created list (mark the question mark with the mouse) [[Datei: | + | *** Compare the installation path with the previously created list (mark the question mark with the mouse) [[Datei:Setup_show_path.png|200px|frameless|thumb|Setup show path]] |
**** If the installation path matches, confirm with '''Next''' | **** If the installation path matches, confirm with '''Next''' | ||
| − | **** If the installation path does not match, select the option '''"No, install into a different directory"''' [[Datei: | + | **** If the installation path does not match, select the option '''"No, install into a different directory"''' [[Datei:Setup_choose_different_path.png|150px|frameless|thumb|Setup choose different path]] and confirm with '''Next''' |
| − | ***** Enter the correct installation path [[Datei: | + | ***** Enter the correct installation path [[Datei:Setup_enter_path.png|200px|frameless|thumb|Setup enter path]] and confirm with '''Next''' |
* If presented, '''[[General installation instructions#Warning messages|read warning messages carefully]]''', if anything is unclear, talk internally to project managers about the possible effects of the update | * If presented, '''[[General installation instructions#Warning messages|read warning messages carefully]]''', if anything is unclear, talk internally to project managers about the possible effects of the update | ||
* Confirm further screens within the setup with '''Next''' | * Confirm further screens within the setup with '''Next''' | ||
| Zeile 114: | Zeile 114: | ||
| | | | ||
* Update is not possible during operation if the SPM plugin is used | * Update is not possible during operation if the SPM plugin is used | ||
| − | * | + | * For updates of version <= 1.6.4: [[Plugin installieren / aktualisieren (Tarifwerk)|please also update all plugins]] |
|} | |} | ||
| Zeile 124: | Zeile 124: | ||
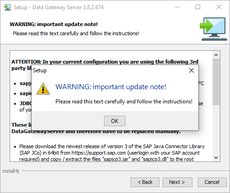
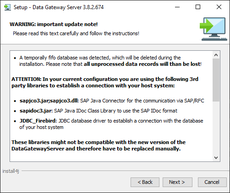
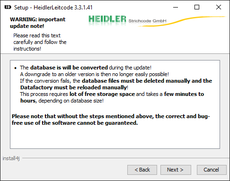
==== Example warning messages ==== | ==== Example warning messages ==== | ||
{| style="width:100%" | {| style="width:100%" | ||
| − | ![[Datei: | + | ![[Datei:Update_warning_message_1.png|frameless|center|230px|mini|Update warning message 1]] |
| − | ![[Datei: | + | ![[Datei:Update_warning_message_2.png|frameless|center|230px|mini|Update warning message 2]] |
| − | ![[Datei: | + | ![[Datei:Update_warning_message_3.png|frameless|center|230px|mini|Update warning message 3]] |
| − | ![[Datei: | + | ![[Datei:Update_warning_message_4.png|frameless|center|230px|mini|Update warning message 4]] |
|} | |} | ||
Aktuelle Version vom 9. Februar 2022, 17:58 Uhr
Update procedure
- Locate existing installation(s)
- Verify the installed version
- Run the setup
- Complete installation
- Perform functional testing
Locate existing installation(s)
The localization usually takes place automatically in the installer. In many cases, however, the necessary registry entries may be missing due to server migrations or instance duplications. It is also common for DataGatewayServer and HVS32Monitoring to be installed in multiple instances, so it is often essential that the installation paths are localized manually.
Localization of installations via Windows services
|
|
Localization of installations via Windows search
|
Verify the installed version
| To verify the version, open the file properties of the Main EXE of the application (see table under Installation instructions) in Explorer.
[application].exe -> Right click -> Properties -> Details -> File version / Product version |
|
Run the setup
| Please note the application-related information in the Installation instructions table in the Update notes column.
If you have an HVS32 test system/test server, install the updates on the test system first! To be as safe as possible, preparations can be made for a Manual Backup - Restore.
|
Installation instructions
| Software product | Service name | Main EXE | Versions | Update notes |
|---|---|---|---|---|
| DataGatewayServer V2 | DataGatewayGuardian
DataGatewayServer |
DataGatewayService.exe | 2.X.X.X |
|
| DataGatewayServer V3 | DataGatewayServer | DataGatewayService.exe | 3.X.X.X |
|
| Leitcode V3 | Heidler-Leitcode | HeidlerLeitcode-Service.exe | 3.X.X.X |
|
| SEMWeb | Heidler-SEMWeb | SEMWebService.exe | 1.X.X.X | |
| Statusdatenamanger | Heidler-StatusdatenManager | StatusdatenManager-Service.exe | 1.X.X.X | |
| HFMS | Heidler-TarifWerk | TarifWerk-Service.exe | 1.X.X.X |
|
Warning messages
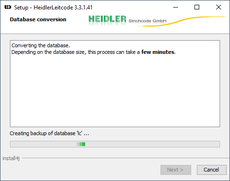
During the installation, warning messages are displayed, e.g. that a database conversion is being carried out during the update or that further manual steps are required after the installation.
The warnings and the information contained therein must be observed!
Example warning messages
Complete installation
At the end of the installation, it must be checked that the application was started or can be started again after the update.
For services, check whether the service was started after installation or start the service manually in the Windows service management ( services.msc ).
Perform functional testing
To ensure that an update was successful, function tests tailored to the application are necessary!
The tests must not only be carried out on the test system, but also in the productive environment!
Manual Backup - Restore
For a rollback, local backup copies of the applications can be created, which should be deleted again after a successful update and function test.
Backup
- Close all applications (configurators, processing screens, services, ...) of the corresponding software product
- Make a local copy by either creating an archive or duplicating the installation directory
- Give the backup a comprehensible name, e.g. add the suffix "_bak" and the date to the folder name
Restore
- Close all applications (configurators, processing screens, services, ...) of the corresponding software product
- Rename the current application directory, e.g. add the suffix "_error" to the folder name
- Unzip the local backup or rename it back to the original folder name
- Carry out the following steps, Complete installation and Perform functional testing
Additional notes
Incompatibility with legacy systems (Firebird 1.5)
According to the Update notes column in the table under Installation instructions, some services in their latest version are no longer compatible with systems that still use the Firebird database engine in version 1.5.
If you are still using a service that has a correspondingly noted dependency with Firebird, you must not carry out the service update, as this will no longer provide any functionality!
If you are still using Firebird 1.5 and are affected by the service updates mentioned above, your system must first be migrated to Firebird 2.5. For more information see the following article: Upgrade Firebird Datenbank-Engine
Upgrade from SAP Java Connector (SAP JCO) 3.0 to 3.1
When using SAP JCO and updating this component, it should be noted that all components used by SAP JCO must also be updated. The SAP JCO 3.0 driver uses and requires the Microsoft Visual Studio C/C++ 2005 version, which is installed with the SAP GUI. With the latest SAP JCO 3.1 version, however, the Visual C++ 2013 version is required. If the version is not available, you will receive the following error message from SAP JCO:
java.lang.ExceptionInInitializerError: JCo initialization failed with java.lang.UnsatisfiedLinkError: <Pfad>\sapjco3.dll: Can't find dependent libraries
More information about SAP JCO at: https://support.sap.com/en/product/connectors/jco.html
