Setup: configurator: Unterschied zwischen den Versionen
Lappl (Diskussion | Beiträge) K (Fixed DE link) |
|||
| (23 dazwischenliegende Versionen von 2 Benutzern werden nicht angezeigt) | |||
| Zeile 1: | Zeile 1: | ||
| + | [[de:Setup:_Konfigurator]] | ||
| − | + | = client/sender = | |
| − | |||
| − | |||
| − | |||
| − | + | *[[configurator:_client/sender|client/sender]] | |
| − | + | = Internet connection= | |
| − | + | *[[configurator:_Internet_account|Internet account]] | |
| + | *[[configurator:_email|email]] | ||
| + | *[[configurator:_ftp|ftp]] | ||
| + | *[[configurator:_http|http]] | ||
| + | *[[configurator:_sms|sms]] | ||
| + | *[[configurator:_connection test|connection test]] | ||
| − | + | = country codes = | |
| − | + | *[[configurator:_country_codes|country codes]] | |
| − | + | = system settings = | |
| − | |||
| − | + | *[[configurator:_label_printer|label printer]] | |
| + | *[[configurator:_output_channels|output channels]] | ||
| + | *[[configurator:_parameter_scale1|parameter scale1]] | ||
| + | *[[configurator:_parameter_scale2|parameter scale2]] | ||
| + | *[[configurator:_extras_(1)|extras (1)]] | ||
| + | *[[configurator:_extras_(2)|extras (2)]] | ||
| − | + | = station settings = | |
| − | + | *[[configurator:_general|general]] | |
| − | + | *[[configurator:_system_startup|system startup]] | |
| + | *[[configurator:_client|client]] | ||
| − | = | + | = processing = |
| − | + | *[[configurator:_general_processing|general processing]] | |
| + | *[[configurator:_dangerous_goods|dangerous goods]] | ||
| + | *[[configurator:_Data-Gateway-Client_(1)|Data-Gateway-Client (1)]] | ||
| + | *[[configurator:_Data-Gateway-Client_(2)|Data-Gateway-Client (2)]] | ||
| + | *[[configurator:_automatic_polling|automatic polling]] | ||
| + | *[[configurator:_action_from_file|action from file]] | ||
| + | *[[configurator:_file_stack|file stack]] | ||
| + | *[[configurator:_delivery_data_(1)|delivery data (1)]] | ||
| + | *[[configurator:_delivery_data_(2)|delivery data (2)]] | ||
| + | *[[configurator:_article_processing|article processing]] | ||
| + | *[[configurator:_short_ collection|short collection]] | ||
| + | *[[configurator:_pre-processing|pre-processing]] | ||
| + | *[[configurator:_incoming_packages|incoming packages]] | ||
| + | *[[configurator:_address_data|address data]] | ||
| − | = | + | = host-IDs = |
| − | + | *[[configurator:_host_IDs|host IDs]] | |
| + | = host status return file = | ||
| − | + | *[[configurator:_host_status_return_file|host status return file]] | |
| − | + | = host return file = | |
| − | + | *[[configurator:_host_return_file|host return file]] | |
| − | + | = carrier = | |
| − | + | *[http://heidler-strichcode.de/carriers/?lang=en Carrier] | |
| − | + | == Configurator of the carrier == | |
| − | + | The configurator for each carrier can be accessed via the setup menu. Select the corresponding logo of the carrier in the display window to start the configurator. The printing of labels can only proceed after successfully configurating this section. | |
| − | + | Note: | |
| − | + | The successful configuration still does not authorize the dispatch. Only after the labels being verified by the responsible carrier, the dispatch with the HVS32 can proceed. This formality is explicitly expected by the carrier for each new installation and must be done. | |
| + | [[Datei:Configurator_Legend.PNG|mini]] | ||
| + | The navigation in the configurator is simplified through the use of the "traffic light system". Each step of the configurator is now directly selectable via the navigation bar. | ||
| − | + | Since some master data needs to be filled in, not all sections are available from the start. These will be unlocked during the process of configuration. | |
| − | + | The buttons "next" and "back" save the current inputs and switch between the pages. | |
| − | |||
| − | |||
| − | |||
| − | |||
| − | |||
| − | |||
| − | |||
| − | |||
| − | |||
| − | |||
| − | |||
| − | |||
| − | |||
| − | |||
| − | |||
| − | |||
| − | |||
| − | |||
| − | |||
| − | |||
| − | |||
| − | |||
Aktuelle Version vom 9. Februar 2024, 17:58 Uhr
client/sender
Internet connection
country codes
system settings
station settings
processing
- general processing
- dangerous goods
- Data-Gateway-Client (1)
- Data-Gateway-Client (2)
- automatic polling
- action from file
- file stack
- delivery data (1)
- delivery data (2)
- article processing
- short collection
- pre-processing
- incoming packages
- address data
host-IDs
host status return file
host return file
carrier
Configurator of the carrier
The configurator for each carrier can be accessed via the setup menu. Select the corresponding logo of the carrier in the display window to start the configurator. The printing of labels can only proceed after successfully configurating this section.
Note:
The successful configuration still does not authorize the dispatch. Only after the labels being verified by the responsible carrier, the dispatch with the HVS32 can proceed. This formality is explicitly expected by the carrier for each new installation and must be done.
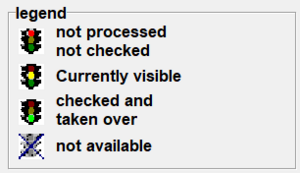
The navigation in the configurator is simplified through the use of the "traffic light system". Each step of the configurator is now directly selectable via the navigation bar.
Since some master data needs to be filled in, not all sections are available from the start. These will be unlocked during the process of configuration.
The buttons "next" and "back" save the current inputs and switch between the pages.
